This is the art of hurting things until they die, while avoiding dying yourself, and gives a general overview of the methods both you and enemies will use to hurt each other. If you are looking for offensive skills and ability trees, see Offense.
Weapons[]
No two weapons are created alike, and different situations may call for different armaments (for example, against spiders you may want to sheathe your sword and take up a hammer instead). These are the various weapon categories:
Simple Weapons: What a normal citizen would perceive as a walking stick is a perfectly serviceable kneecapper to a thug. Cheap and easy to find anywhere and a boon for the resourceful, but lacking in damage. Covers clubs, quarterstaves, and whips.
Swords: Steady damage and a critical profile focused on frequent critical hits. Most swords deal both Slashing and Piercing damage, giving them an edge in versatility. Bastard swords, claymores, daggers, longswords, rapiers, scimitars, and shortswords fall under this category.
Axes: Deals more damage than swords but with greater variability, and delivers more damaging criticals, but has a lower chance to inflict critical hits in return. Handaxes and battleaxes fall under this category.
Hammers: Highly variable damage spread, but has the highest potential maximum damage, and most effective at thwarting armoured targets. Poor overall critical profile. Flails, greathammers, morningstars, and warhammers fall under this category.
Polearms: Two-handed weapons with reach, allowing the wielder to attack from a safer distance. Covers spears and halberds.
Gloves & Gauntlets: Determines unarmed damage; the heavier, the more damaging. A number of modifications can be attached to gloves and gauntlets to allow the wearer to perform other, unrelated functions.
High-Caliber Firearms: Guns. Highest critical damage potential, but requires some micromanaging as compared to other, more conventional weapons. Requires either pistol or rifle bullets depending on the gun being used. Carbines, hunting rifles, pistols, and revolvers fall under this category.
Low-Caliber Firearms: Firearms that employ low-caliber bullets. Excepting the jezail, guns in this category are fully automatic and have a high rate of fire. While they deal less damage per bullet than their high-caliber counterparts, the cheaper cost and lighter weight in ammunition allows the wielder to carry more of said ammunition, or avoid encumbrance. Most effective against lightly armoured targets. Covers handguns, jezails, and submachine guns.
Hybrid Firearms: Firearms that are normally used as a melee weapon, but fire bullets when activated, and level the appropriate skill when doing so. Shotguns are able to slot a wide variety of pellets, giving them some versatility, while gunblades can fire three bullets at a time. Hybrids are offset by a slightly lower melee damage profile and a very limited magazine capacity for their bullets. Flamethrowers, gunblades, shotguns, and shotgun axes fall under this category.
Crossbows: Large and heavy with somewhat middling damage, employing bolts as ammunition. Wider critical range than most ranged weapons. Crossbows are less noisy than a gun and are the only ranged weapon type that can be used underwater. Covers crossbows and automatic crossbows.
Throwing Weapons: When using an implement to throw projectiles for you becomes unfeasible, throwing weapons still exist. Covers the shuriken, throwing axe, and throwing hammer.
Grenades & Bombs: Area-of-effect projectiles coming in many different flavours and can inflict various status effects. Prone to friendly fire; use with caution.
Armor[]
As you fight, you will get hurt, and knowing the armor you wear can mean the difference between making off with your ill-gotten goods or running away with your tail between your legs.
These are the different types of armor:
Light Armor: Armor that sacrifices protection for versatility and mobility. Characters that employ a bit of skulduggery would also find armor in this category less noisy than others, and characters that engage in a lot of strenuous activity would find light armor easier on their reserves of stamina. Padded armor, leather, studded leather, and chain shirts fall under this category.
Medium Armor: Armor that shares some characteristics of both heavy and light armor in both protection and mobility, though it is not as committed to either as the other two categories. Ideal for adventurers wanting some degree of protection without the commitment that heavier armour demands. Chainmail, scale, and breastplates fall under this category.
Heavy Armor: Armor that epitomizes protection at the cost of mobility and stamina reserves. Heavy scale, partial plate, and full plate fall under this category.
Uncategorized: Armor that does not increment nor gain bonuses from any defensive skills. Dive helmets (unmodified), jetpacks, and tailored clothing fall under this category.
Demolitions[]
Demolitions cover the gamut from the basic frag grenade to a pricey Tesla bomb. They are very powerful devices that can potentially turn the tide of battle, but are subject to friendly fire and it can end as badly for you as it would the enemy!
To use a grenade or bomb, left-click the munition on the hotbar, or right-click the icon and select the name of the grenade. A marker will show up with a circle denoting the area the grenade would affect, and all that's left is to place it at the desired position and left-click again to throw the grenade.
However, throwing demolitions requires an attack roll to land on target. Missing will have the grenade hit some other location either nearby or far away, depending on how badly you miss. Practice makes perfect, though, and every demolitionist can claim at least one accuracy-based mishap on the road to mastery.
These are the different types of Demolitions you will have access to:
Frag Grenade: Simplest of grenades. Deals physical damage in a modest radius that can be mitigated by Armor.
Concussion Grenade: A grenade tailored more for suppression than damage. It has a small radius, but the damage bypasses armor and it can temporarily daze anything caught in the blast.
Incendiary Grenade: Indulge your pyromania. This grenade, once lobbed, will create a wide field of burning ground where it lands, inflicting fire damage on everything caught in it that ticks over time.
Smoke Grenade: This grenade deals no damage. Instead, when tossed, it will create an obstructing field of smoke that hinders attacks and allows stealthy characters to regain cover to hide in.
Pellet Grenade: Similar to a frag grenade, all a pellet grenade does is deal physical damage. The pellet grenade can potentially deal more damage than a frag, and is easier to mitigate friendly-fire mishaps, but its nature makes consistent damage more difficult to pull off.
Oil Flask: This grenade deals no damage by itself, but creates a wide field of slippery oil that can cause targets within to be easily knocked down.
Cryo Bomb: When lobbed, this grenade will deal cold damage and may freeze creatures caught in its wide radius.
Tesla Bomb: This grenade will deal electric damage to everything caught in its wide radius.
Wash Bomb: This grenade will douse a single target in water, removing acid and fire-based damage-over-time effects and amplifying electric damage.
Equipment Levels[]

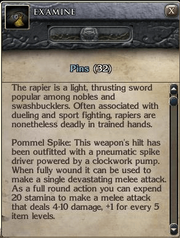
A level 32 rapier outfitted with a pommel spike augment.
Unlike regular NWN2, you do not need any special proficiency feats to wield weapons and armor; in fact, you can wield almost anything you choose. However, how good you are with the gear you're wearing depends on how proficient you are with the skill that you are using the equipment with (e.g. Longsword wielded in both hands uses Two-Handed, Longsword with a shield uses One-Handed), and the level of the gear you are using.
An item's level is represented by a number beside the equipment name, like the weapon depicted here.
To paraphrase an old adage, a weapon is only as good as the arm that wields it. Your actual skill in a piece of equipment is capped by either the level of the equipment or your skill level, whichever is lower. A person with only 3 ranks in the Two-Handed skill will get as much benefit out of a Longsword (30) as he would if he wielded a Longsword (3). Similarly, a person with 30 ranks in Two-Handed will be no better at using a Longsword (3) than the aforementioned person (unless they had Abilities that affected their combat style).
Equipment levels also determine how quickly you progress in the skill the piece of equipment is using. If you are too skilled for your weapon or armor, you will end up not learning a lot of technique from it. You can learn a whole lot more with a better piece of gear, even if it seems a little too well made for your liking.
Fighting[]
Basics[]
To engage an enemy in combat, you can either click on them, target them and press whatever button you use for "default action", or right-click the target and select the "Attack" option. When highlighting things, enemies will be highlighted in red.
Upon clicking, if your character wields a ranged weapon, they will start attacking. Otherwise, if the target is not adjacent, the character will approach the target to attack. Your character will take the most direct path to the target, so be wary when area-of-effect abilities or ambushes come into play--it would be most awkward to arrive to the fight half-dead because you crossed an incendiary grenade field or walked right into a trap beforehand!
All characters start with two attacks per round, though this number can be adjusted depending on your skill level, the attacking style being used, and the abilities you have. For example, wielding an extra weapon in your off-hand will give you extra attacks at the cost of accuracy. Moving in the middle of attacking will sacrifice any remaining attacks in your round. Abilities will reduce or increase the amount of attacks you can make in a round. And so forth.
Fighting is not all about offense, though. In the act of fighting, enemies will attack you in return, and defense can come in the form of a high Dodge (AC) rating to avoid the attack, or a high Armor (DR) rating to potentially shrug off the blow. You also have an arsenal of tools and consumables, such as healing and stamina potions, to restore resources expended during combat.
Knowledge and practice in the career of combat makes the difference between staying alive and being another body for others to loot in their own search for fortune and glory.
Firearms[]
Guns operate on a somewhat different wavelength than regular weapons. First, the amount of attacks per round you get with them is limited to their Rounds Per Minute rating, otherwise known as RPM, and will not increase with greater skill in Marksmanship. A weapon with high RPM gets more attacks per round than a weapon with lower RPM, though firearms with low RPM tend to compensate by dealing more damage per bullet.
The amount of attacks you can make in a round is also dependent on current magazine size. If your firearm can attack six times per round but you only have one round remaining in your magazine capacity, you will only be able to fire one bullet that round as you will be spending the rest of it and the next round reloading your firearm.
Reloading your firearm costs Stamina to a greater or lesser extent depending on the gun and the reloading mechanism, which is split into two categories: Individual and Magazine. An Individual reloading mechanism allows a gunman to slide individual bullets into the chamber, while a Magazine method requires the gunman to insert the bullets into a magazine first before inserting the magazine into the gun. Magazines are sold separately from the gun, so if you buy a gun that reloads via magazine, remember to also buy a magazine for the gun as well.
An Individual reloading mechanism benefits from being able to be reloaded in combat, but their magazine capacity tends to be limited and reloading tends to cost more Stamina. On the other hand, a Magazine mechanism tends to be larger and is less taxing on the Stamina but forbids reloading magazines in the middle of combat, obligating a gunman to be judicious with their bullets in protracted gunfights.
Defense and Resistance[]
First, there is Dodge, otherwise known as "Armor Class" in other, more conventional Neverwinter Nights modules. Dodge is what a to-hit score tries to roll against and determines whether an attack will miss. Obviously, a high Dodge is beneficial to prevent being hit in the first place.
Second, there is Armor, which is also known in more conventional settings as Damage Reduction. However, unlike other servers whose abilities and spells grant a static amount of Damage Reduction, the amount of damage actually mitigated by Armor varies from round to round, so a hit can barely scratch you one moment and deal devastating damage the next. Increasing your Minimum Armor score increases the minimum amount of damage you can mitigate, easing the variability somewhat.
Next, there are resistances if Dodge and Armor fail. There are resistances against area-of-effect attacks, knockdown, wounding, and common elements (e.g. fire, acid). These come in handy when bracing against an opponent's shield slam or sneak attack, minimising the damage that could have been done. There are items and abilities that help improve these resistances and give you bonuses to overcome an enemy's resistances to these effects.
Companions & Pets[]
Your character may eventually come across hirelings looking for someone who needs their expertise, and all you need to do is to talk to them to hire their services. These companions scale to your general combat expertise and can provide valuable support in areas that would be overwhelming otherwise, making them ideal for times of low server populations or for parties missing a niche and looking for someone to fill it.
These companions can be ordered to stand still, guard you, or engage the nearest enemy in sight, among other commands. You will need to right-click on their portrait and access the commands from "Issue Command", or use emote hotkeys to order them thusly. If they are downed in battle, they will revive once combat is over.
You do not necessarily need to pay these NPC-controlled companions up-front, but during expeditions they may take a share of their loot from treasure you find. Still, it is a price worth paying when it leads to a successful expedition.
Pets operate in a similar manner. They gain experience and levels from attacking enemies and being struck, and while they do not demand payment for their services, nor unduly affect dungeon scaling, they need time and effort to become worthwhile companions in their own right, and can seem weak in comparison to a proper hireling.
Stealth[]
To enter Stealth mode, press the "Stealth" icon in your quickbar, and your character will enter Stealth mode. How well your character can remain unseen and unheard depends on a number of factors ranging from any stealth and noise penalty modifiers on your equipment, to the lighting of the area you are in, and the capability of others around you to detect your presence at that moment.
Sneak Attacks in Engines of Ascension operates a little differently from other servers. Sneak Attacks, for the most part, can only be inflicted when the opponent has not seen or heard your presence, though there are other ways for a dedicated ambusher to inflict extra damage even when actively engaging their enemy.
Sneak Attack damage is not dealt all at once; rather, it is inflicted as wounding damage, which deals damage over time. Abilities and weapon modifications can change how much and how quickly this damage is dealt.
Strategies[]
- Bring a friend. Be careful, though; more friends bring more attention.
- Look for bestiaries when fighting monsters.
- Flanking your enemy (hitting them at the sides or rear) will give you a +2 attack bonus to hit them, which makes it useful for attacking enemies that are difficult to hit. However, the same also applies to you, and in a heated firefight it would be wise to watch your flanks if you rely on Dodge to stay alive.
- Employ grenades, bombs, and other gadgets. They can potentially turn the tide of a battle.
- While fighting, keep an eye on your Hit Points and Metabolism. Obviously if your Hit Points reach zero you are no longer capable of fighting, but if your Metabolism becomes too high from drinking too many potions, then it will incapacitate your character for a round or two until your Metabolism reduces to safe levels. If your Metabolism exceeds its limit when under the effects of poison, you will die.
- Reloading your firearm costs Stamina. Sometimes, you may not have enough Stamina to reload a full clip. In this case, splitting your bullets into partial clip sizes allows you to reload a partial clip, conserving Stamina.
- While hidden, you are less likely to be spotted when the spotters are distracted.